The joys of Danish {Rugbrød} and the endless possibilities of {Smørrebrød}
A long time ago, I went on a two-week geology field trip in Wyoming’s Wind River mountain range that was catered by some very health-conscious teaching assistants. After several days of soy milk, brown rice, and oatmeal, the camp had adopted a new slogan: “Eat cardboard, live to be 101.”
Although I now truly enjoy many of the foods we mocked then, this phrase still resurfaces—and gives me a laugh—when I see something so wholesome looking that I just can’t imagine it tasting any good.
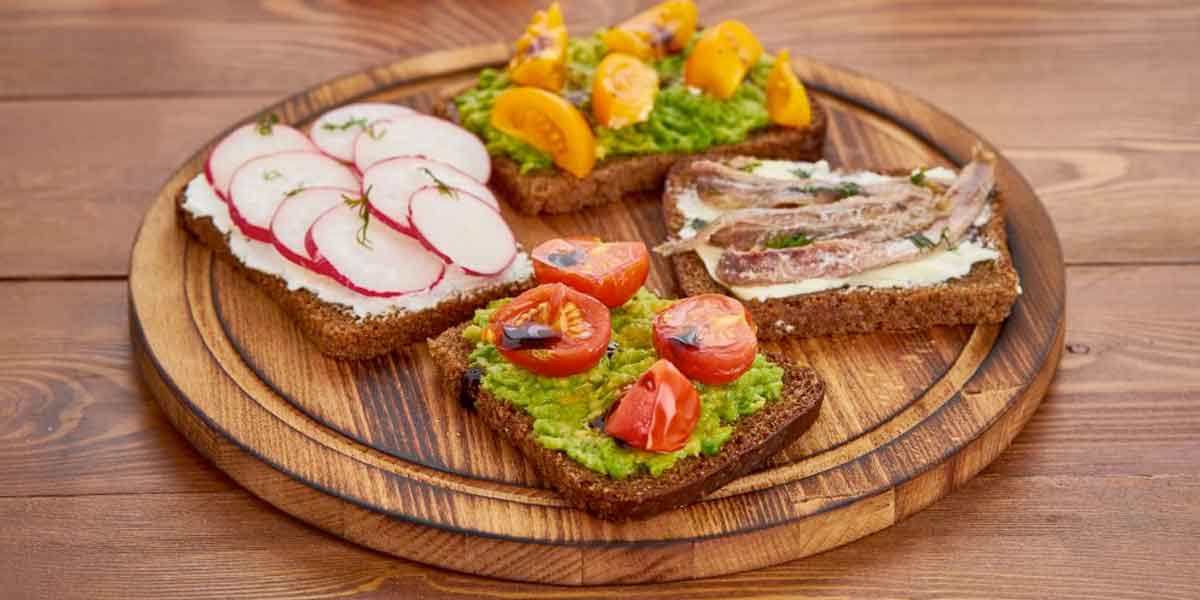
That was exactly the thought that crossed my mind the first time I encountered Danish rugbrød (ryebread), a dense brick of whole grains and seeds that could knock the wind out of you if used as weapon. It is dark brown, and exudes an aura of serious healthfulness, at least until you slather it in butter and load it down with meat and cheese to make the preferred Danish lunch, smørrebrød.
Smørrebrød literally means bread and butter, and I was overwhelmed with the unified national enthusiasm for it. You might say peanut butter and jelly is the all-American lunch, but I don’t know anyone who ate that regularly after 6th grade. In contrast, every day during my 6 month visit, work stopped at noon on the dot, and everyone assembled in the meeting room for lunch. All of the Danes I worked with unfailingly packed a lunch which typically consisted of open-faced rye sandwiches in various stages of assembly. The toppings ranged from cheese and vegetables to lunch meat to leverpostej, a popular liver spread. A great alternative are these zucchini sandwiches I made recently.
I decided to give it a go, albeit without the generous heaps of curried herring that are recommended, and I was immediately hooked. Rugbrød has a wonderfully rich flavor, a hearty, moist texture, and is immensely satisfying—I suddenly appreciated why it is cut into ¼” slices! Like my Danish colleagues, my favorite midday meal is now a platform of ryebread topped with hummus and cheese and piled high with arugula and avocado. I savor every bite, and rarely meet the ugly beast of late-afternoon hunger after I have lunched on Smorrebrod!
This is probably because rugbrød is a heavyweight when it comes to nutrition. First, it is literally half whole grains and seeds. I don’t mean whole grain flour; I mean actual rye berries. Kibbled rye is a necessary ingredient, which I have not found in the US, but which is easy to make with a coffee grinder. Simply pulse whole berries in the grinder for a few minutes to expose a fresh surface and voila—kibbled rye!
Of what little flour there is, two-thirds of that is rye flour. The rye grain is very different from wheat, capable of absorbing 6 times its weight in water and full of enzymes that digest starch, making it unsuitable for leavened bread. However, these properties result in a flavorful, uniform lattice that is perfect for stacking with toppings!
Rye flour also contains high proportions of bran and germ, qualifying it as a “whole grain” ingredient. For comparison, 100 g of rye flour contains 23 g of fiber and 14 g of protein compared to a paltry 3 g of fiber and 10 g of protein in all-purpose white flour! It also contains significant servings of healthy omega-3 and omega-6 fatty acids!
While rye does contain naturally occurring glutenin, these molecules do not form long gluten chains, preventing it from developing the same “strength” as wheat dough and rising the same way.
Now I have teased you and tempted you, and now I have to tell you the bad news. It is almost impossible to find rugbrød outside of Northern Europe. This means you have to make it yourself. And I’ll level with you: it takes some time and it’s not that easy. But it is so worth it! I got this recipe from a Danish friend who lived abroad and found himself in a similar state of withdrawal. I have taken notes on my last three executions and have tried to distill what I have learned, but I cannot promise success on the first iteration.
The recipe seems very sensitive to certain variables, chief among them the shape of the bread pan. In Denmark, rugbrød has a perfectly square cross-section, and I believe there is a reason for this. I found pans that came pretty close (3″ tall x 3-4″ wide x 12″ long), and these were a big improvement on the standard shape. The bread cooked faster and more evenly.
It may be intimidating, but I know, dear reader, that you can do it. May the force be with you, and may you live to be 101 without the cardboard!
(Makes 2 long loaves, serves 30)
*THIS RECIPE CONTAINS GLUTEN!
Special Equipment
For this recipe, you will need a few things you may not have lying around. These include:
1. A clean(ish) coffee grinder
2. A cooking scale
3. A very large mixing bowl
4. Long, square bread pans (3″x 3″x 12″)
5. A sourdough starter that has been eating rye flour for a few days
6. A baking stone (optional)
Ingredients
- 300 g of rye sourdough starter
- 2 tbsp salt
- 250 g white bread flour
- 450 g rye flour
- 575 g kibbled rye (this can be made by grinding rye berries in a coffee grinder)
- 12 oz. dark beer
- 1-2 tablespoon honey
- 450 g seeds (I like to use sunflower and pumpkin)
On the first night, mix the well-hydrated sourdough starter into 1 L of warm water. Add the salt, white flour, rye flour, and 375 g of kibbled rye. The texture should be soft, like a wet porridge, after both mixings. Cover and let sit overnight in a warm spot.
The next morning, add the remaining kibbled rye, beer, honey and seeds. Cover and let sit 5 hours.
Transfer to two greased bread pans, and leave for at least 3 hours more.
An hour before the end of the last ferment, put the baking stone in the oven and preheat to 390°F. When fermentation is complete (3 or more hours have passed), put the bread in the oven and bake for 2 hours.
The real crux here is to decide when it is done. I’ve read that it should sound hollow when knocked upon and that a toothpick should come out clean. Neither of these has been a decisive test for me. The best advice I got was, if you are not sure, turn the oven off and leave the bread inside as it cools. This has worked well.
When it is cool enough to handle, remove from the oven and leave overnight covered in a damp cloth. Do not cut into your bread for at least 12 hours after baking!
An amazing thing about this bread is the evolution it undergoes during the first few days. When you have just baked it, the crust will be fairly hard and tough. By the 3rd day, it will have softened considerably, and will offer the same resistance as the inside of the bread. The best explanation I can think of is that moisture from the interior migrates outward, homogenizing the bread. Days 3-5 are perfect rugbrød eating! It will last over a week in the cupboard, and can easily be frozen.
There’s not much to say except the sky is the limit. A general rule of thumb is—in stratigraphic order—some kind of spread, some kind of meat or cheese, and some kind of vegetable. Traditional toppings include eggs, shrimp, and herring. I like to use baked tofu, hummus, bell pepper, and avocado. Sprinkle with cracked pepper, salt, olive oil, or some balsamic vinegar, and you’ll find a sophisticated lunch awaits!
- 300 g of rye sourdough starter
- 2 tbsp salt
- 250 g white bread flour
- 450 g rye flour
- 575 g kibbled rye (this can be made by grinding rye berries in a coffee grinder)
- 12 oz. dark beer
- 1-2 tablespoon honey
- 450 g seeds (I like to use sunflower and pumpkin)
- On the first night, mix the well-hydrated sourdough starter into 1 L of warm water. Add the salt, white flour, rye flour, and 375 g of kibbled rye. The texture should be soft, like a wet porridge, after both mixings. Cover and let sit overnight in a warm spot.
- The next morning, add the remaining kibbled rye, beer, honey and seeds. Cover and let sit 5 hours.
- Transfer to two greased bread pans, and leave for at least 3 hours more.
- An hour before the end of the last ferment, put the baking stone in the oven and preheat to 390°F. When fermentation is complete (3 or more hours have passed), put the bread in the oven and bake for 2 hours.
- The real crux here is to decide when it is done. I’ve read that it should sound hollow when knocked upon and that a toothpick should come out clean. Neither of these has been a decisive test for me. The best advice I got was, if you are not sure, turn the oven off and leave the bread inside as it cools. This has worked well.
- When it is cool enough to handle, remove from the oven and leave overnight covered in a damp cloth. Do not cut into your bread for at least 12 hours after baking!


